about this Blog

After I (more or less) finished my 1966 Volkswagen Fastback the "Volksback", it was time for another challenge, here it is!

Donnerstag, 25. Juli 2013

back from the blaster...

In the meantime I collected the floorpan, IRS arms and various bits and pieces from the Master Blaster, Jens Kraft: http://www.sandstrahltechnik-kraft.de/

Here the pan, in a fresh coat of primer, still in the Master's workshop:

parts are looking good again, powder coated or zinc plated:


 the IRS arms:

unfortunately, the bump stop anchors were rusted away:


but, luckily there is an easy cure for that:
 So, I will drill a centered hole in the domes and screw on new anchors!


Samstag, 6. Juli 2013

some work on the Streaker

I de-skinned an old decklid to have special bracket for the streaker decklid:

and today I hauled the chassis to the Master Blaster:
... of course I also took a lot of other bits for new zinc plating / powder coating as well:
(the tie rods are not bend, it is only in the pic...)


the crappy Taiwanese chrome plating has to go!


I am sure those parts will be better as new again... stay tuned for updates...

Samstag, 15. Juni 2013

my - slightly disappointing - Wanroij prey

Even though there were a lot of vendors on the VW Euro in Wanroij (see my thread here), I only managed to find some boring stuff:
 - a 36 mm 3/4" socket
- a tie rod end for the Streaker's front end
- a set of used, but good Type 3 rear light seals for the Volksback

Freitag, 14. Juni 2013

High hopes for tomorrow's "shopping tour" to Wanroij

During this weekend I will visit the Wanroij VW show (formerly located at Budel =VW Euro).
Hopefully I will find a good header/muffler system for the Streaker!

Sonntag, 2. Juni 2013

Chassis preparations finished... Chassis-Vorbereitungen abgeschlossen

The chassis is ready for media blasting now. The gearbox mount is perfectly welded-on again - as always by Ralf - my main man when it comes to welding tasks. Thank you again for a great job!
( I already wire-brushed the chassis to make the blasting job as easy as possible!)
Das Chassis ist jetzt bereit zum strahlen. Die Getriebehalterung ist wieder perfekt angeschweisst - wie immer wenn es um (für mich) knifflige Schweissarbeiten geht, von Ralf - Wieder mal ein fettes Danke dafür! (Das Chassis habe ich schon mal mit einem Drahtaufsatz für die Flex vom Gröbsten befreit, dann geht's gleich noch besser mit dem Strahlen!)
 

Also the "best part" of the former buid, the chrome hand brake lever is polished and ready for mounting!
Das "beste Stück" des Original-Fahrzeuges - der verchromte Handbremshebel - ist auch schon poliert und wartet auf seine Montage!

The new front beam is painted black and also ready for assembly ... Die neue Vorderachse ist auch schon in schwarz getaucht und erwartet die baldige Montage...


Donnerstag, 23. Mai 2013

some final chassis horror pics

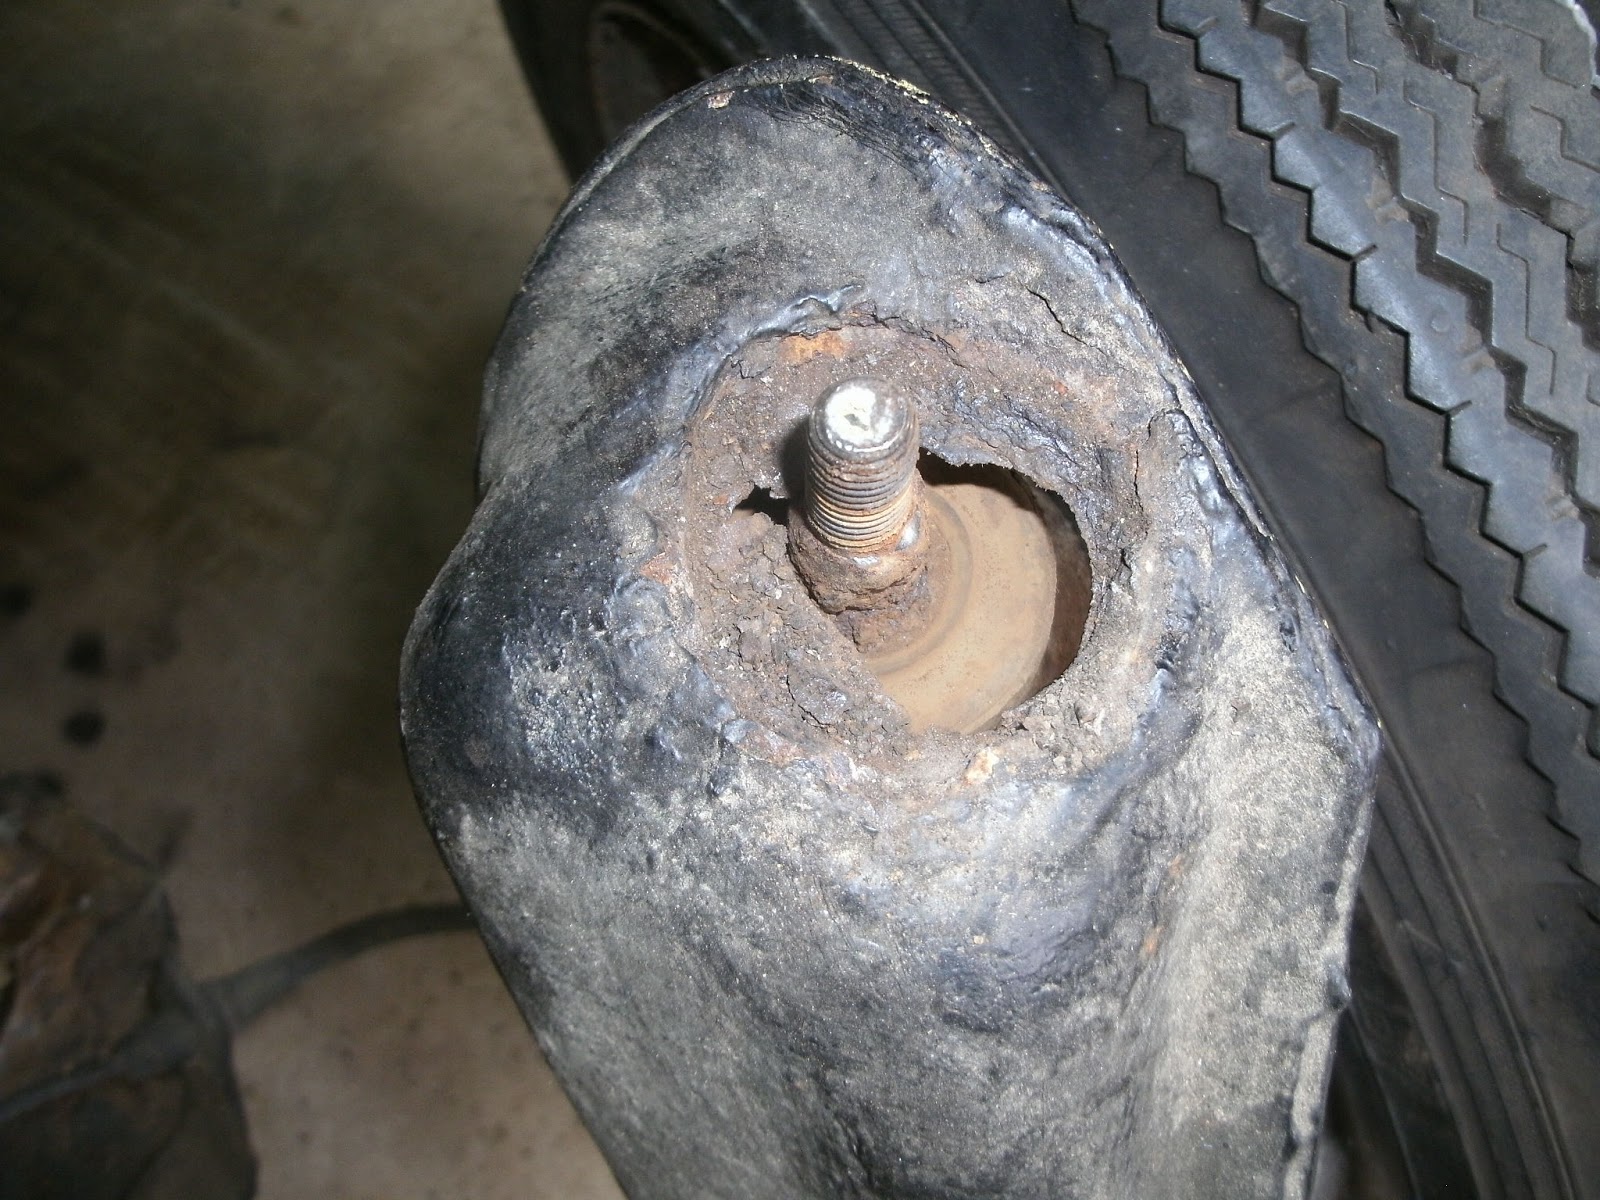
Here is a last pic of the rotten front beam - the hole for damper mounting is rotted away:
Ein letztes Bild der alten Vorderachse: Das Befestigungsloch des Stoßdämpfers war reichlich weggemodert: 
... the whole damper could nearly slip through!
Der Dämpfer könnte schon fast komplett durchrutschen!

The front end of the chassis is filled with rust chips from the frame head...
Der Rahmenkopf ist voll mit "Rost-chips"

Dienstag, 21. Mai 2013

steering box: the final

As mentioned earlier, I threaded the holes in the cover with M10 - but didn't find appropriate plugs, so I made my own.
A standard M6 allen screw has a 10mm head diameter, so I cut a M10 thread into the head, cut off the M6 thread and had perfect plugs! A little loctite -> done!


Wie bereits erwähnt, hatte ich die Bohrungen im Deckel mit M10 Gewinde versehen, habe aber keine passenden Stopfen gefunden, also habe ich selber welche gemacht.
Eine M6 Zylinderkopfschraube hat einen Kopf mit 10 mm Durchmesser - also: M10 Gewinde auf den Kopf schneiden und das M6 Gewinde abtrennen. Fertig ist der Stopfen! Etwas Loctite 'dran und schon sind die Löcher "gestopft"